Saturday, March 26, 2011
Tundra chip
Does anyone ever tried or find any chip for Tundra out there? For better gas mileage...or more horsepower
Left Blinker on the blink
Hi & help... My Gen4 left hand blinker does not work..
The blinker unit 'clicks' fast...
The emergency flasher all work, so the bulbs are good
The 'blinker Unit' works fine when I try in my Gen3
Oh this is so confusing.. ??
There is no power going to the left blinker bulbs at all ??
Any ideas. maybe this is an 'issue' ??
Reply 1 : Left Blinker on the blink
Your Flashers work on all four corners but your Left turn wont light up?
Reply 2 : Left Blinker on the blink
A fast-clicking blinker unit usually means a bulb is burnt out, or not lighting up for other reasons - broken wire, corrosion, etc.
Question: with the left turn signal switch turned on, check the blinker lights - do they light up?... If so, do they look as bright as they should be?
Reply 3 : Left Blinker on the blink
Thanks for help..
Yes all 4 blinkers flash with 'Hazard switch on, including dash indicator arrows.
Also I checked each left blinker bulb out of the car, and they light up,
So bulbs are fine..
No the Dash indicator left arrow does not light up..
The Blinker Unit works fine in another Car (Gen3)
so unit 'seems' fine..
** I did notice before it failed completely, that it worked a few times just fine.. Hmm
I seems to me, that the info is leaving the 'Blinker Unit'...
but not being relayed to the bulbs...
The Hazrds must have a different path..
OMG all that wiring to chase thru... I hope not.
Any othe logics appreciated... I like electrics, but this is beyond me.
and soo unsafe.
Otherwise I luv this car, but the (5 speed) seems a bit 'snatchy' off throttle at low speeds, and fifth gear has started to 'jump out'..
2011 rear diff. question
just traded in my 93 toy. with 255000 mi. for a new 2011 extra cab v6 6 speed sr5 trd off road package, and cant figure out what the diff. is between the a-trac, auto lsd, rr diff lock, and the vsc off buttons. read the owner manual and it just dont explain it enough for me. and does it have 4:10 gears. thanks
Reply 1 : 2011 rear diff. question
Quote:
|
Originally Posted by jbunch 
just traded in my 93 toy. with 255000 mi. for a new 2011 extra cab v6 6 speed sr5 trd off road package, and cant figure out what the diff. is between the a-trac, auto lsd, rr diff lock, and the vsc off buttons. read the owner manual and it just dont explain it enough for me. and does it have 4:10 gears. thanks
|
Quote:
|
2010 TRD OFF-ROAD 4WD DC with 9 drive modes (using VSC Off, A-TRAC & RR Diff Lock switches): 1) 2WD: VSC and TRAC active, 'Vehicle Stability Contro'l and 'Traction Control' (Limited Slip Diff.). 2) 2WD: Switch turns off 'TRAC' and 'VSC', and turns on 'AUTO LSD'. Gives maximum power to tire with traction by braking spinning tire, without cutting power. 3) 2WD: 3 second push of switch turns off VSC, TRAC & AUTO LSD for open differential. 4) 4WD-Hi: VSC and TRAC are both on. No engine power is cut in TRAC while in H4. 5) 4WD-Hi: 3 second push of switch turns off VSC and TRAC. 6) 4WD-Lo: VSC and TRAC are off (open differentials). 7) 4WD-Lo: Push of A-TRAC button activates A-TRAC (Locker-like limited slip). 8) 4WD-Lo: Push of RR DIFF LOCK switch to lock rear differential. 9) 4WD-Lo: RR DIFF LOCK and A-TRAC combined. 5 MPH limit. |
You have 3.73:1 gearing. Only the 6 lug 4 cylinder models come with 4.10:1
Access hole in firewall
Planning to run some wires from the battery to a toggle switch inside the car. Has anyone had any experience in running wires thru an existing hole in the firewall? If so what is the best way?
I see where a bunch of wires are already run thru but can't get my hand in there to even see if there is room to push 3 wires thru cuz it looks so tight. By the way, it's for an led "Knight rider" scanner light that right now is just connected directly to the battery. I'll post a vid when I get a chance. Looks pretty nice!
Reply 1 : Access hole in firewall
yes! theres a rubber grommet and theres a pre-existing hole...but it doesnt go all the way through the grommet so you gotta poke the wires through using a hanger or something.
search my DIY LED STRIP INSTALL nvm here ....
follow all the wires
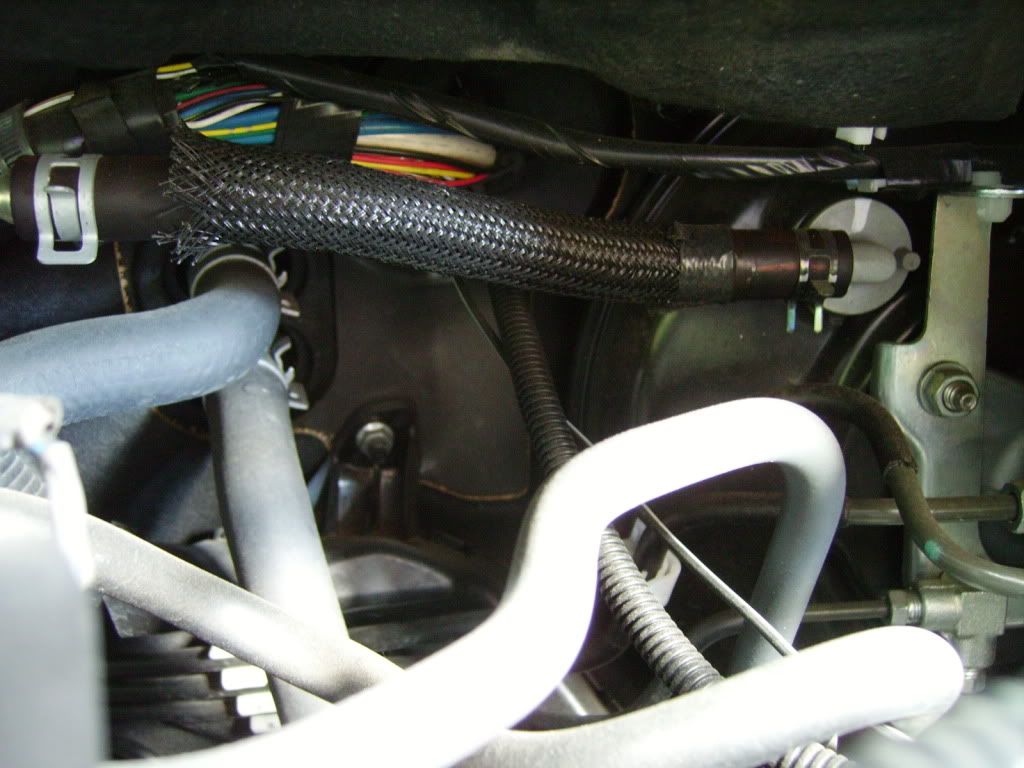
in the middle of the picuture you can see that tiny red dot...thats my wire going through the pre-existing hole. it just has that wire wrap in it so its hard to see

this is from the inside

Reply 2 : Access hole in firewall
Thanks Jack...I'll have to go check that out. Hopefully it's bright and sunny tomorrow. Oh by the way, here is that vid I promised...not too clear..from camera phone.
|
You Tube |
|
|
|
|
Reply 3 : Access hole in firewall
Quote:
|
Originally Posted by Jackss731
yes! theres a rubber grommet and theres a pre-existing hole...but it doesnt go all the way through the grommet so you gotta poke the wires through using a hanger or something.
search my DIY LED STRIP INSTALL nvm here .... follow all the wires in the middle of the picuture you can see that tiny red dot...thats my wire going through the pre-existing hole. it just has that wire wrap in it so its hard to see this is from the inside |
Pretty tight trying to get my hand under there because of the FSB. Will try to run it from the inside out tomorrow.
Reply 4 : Access hole in firewall
Run a coat hanger, thats what I did was pretty easy...
Reply 5 : Access hole in firewall
Quote:
|
Originally Posted by markymark975
Thanks Jack...I'll have to go check that out. Hopefully it's bright and sunny tomorrow. Oh by the way, here is that vid I promised...not too clear..from camera phone.
http://www.youtube.com/watch?v=f8mEbxCBg4s |
Reply 6 : Access hole in firewall
yeah definitely a wire hanger helps out!!!!
Reply 7 : Access hole in firewall
Quote:
|
Originally Posted by Dragon-88  Whats the easiest way to pass the wire through the firewall? I had a look at the picture above and looked in the engine bay and it seemed like a tight fit. Still at work so wont be able to do the lights until tonight. |
Quote:
|
Originally Posted by MiniPacou
take a wire hanger and get a straight wire out of it, make sure there's no bumps/knots and poke it through the grommet's hole. take your electric wire on the back end of the hanger wire and tape it real tight with vinyl electrical tape, it'll go through.
|
Friday, March 25, 2011
Average 1/4 mile times
I have the 2.2 liter w/ an automatic transmission, but i'd like to hear times for both the 4 cylinder and 3.0 6 cylinder in auto & manual form. .
Reply 1 : Average 1/4 mile times
my auto 2.2l has been pushed once and managed an 18.5 quarter

Reply 2 : Average 1/4 mile times
IIRC, a V6 w/ auto did 16-point-something in the brochures. In the real world, IDK.
Reply 3 : Average 1/4 mile times

Reply 4 : Average 1/4 mile times
stock...too slow to bother measuring.
high teens is where the gen3 and 4 camrys live.
Reply 5 : Average 1/4 mile times
With my 95 5S-FE auto my best time was a 17.8s 1/4 mile.
Reply 6 : Average 1/4 mile times
Haven't timed my car, but my 5s-fe 93 auto camry is almost identical in acceleration as my '91 4.3L V6 S-10 Blazer, which ran a 17.88 1/4 mile, So I'm assuming its about the same.

Reply 7 : Average 1/4 mile times
I'm guessing S/T stand for supercharged/turbocharged, but what does SN stand for?
Reply 8 : Average 1/4 mile times
likely Supercharged/Nitrous. a bunch of SC guys did that.
Reply 9 : Average 1/4 mile times
|
You Tube |
|
|
|
|
i'm at 15 some thing? low 15, also not stock, so with the s/c on i should be sitting high 14, then when ever i get money again i'll still be high 14, then when i get more money i'll be ev
Reply 10 : Average 1/4 mile times
Hey its nice to see one little 3VZ-FE snuck in there NA. How did that happen?! Poor old girl, beat-up by all those SC, TC and nitroused 1MZ's.

Reply 11 : Average 1/4 mile times
3mz doesnt count, its as much win as a an MZ motor can get, untill we see the abilities of a 2mz that is.
1mz FTMFW!!!!
Reply 12 : Average 1/4 mile times
it because it was bolted to the 1st gen e153 with the short gearing, it actually should be close to mine i just have a little more top end and .3 more displacement
i want to see the flow rates on the 2mz heads vs the 1mz, thats the only spot of real unknown difference, we know the 2mz has better cams, but do the heads flow the same?
Reply 13 : Average 1/4 mile times
yeah, but i wonder how its gonna do with some...goodies...bolted on.

Reply 14 : Average 1/4 mile times
Those are some pretty darn good numbers on the modded, 1MZ's. Low 13's are hard to get with FWD cars! For you guys who dream about turboing your 5S-FE. My old 2.2L, 4cyl, F2T, SOHC 12V.,5spd. Mazda 626 Touring Sedan, ran at its best a 14.41@ 101mph, all stock components: minus cat. and a played with boost valve@ 12psi. Have fun on the legal track!
Rear Differential parts
The rear differential housing/cover is rusting out and leaking a bit - anyone know where I can by just the hub that encases the differential gears etc? I'd rather not replace the whole rear end if I dont have to.
Reply 1 : Rear Differential parts
What year runner are we talking about here?
Reply 2 : Rear Differential parts
1995 4wd 5 speed 3.0
Reply 3 : Rear Differential parts
After rereading your original question I'm not clear on which part you need. Is it the third member or the diff housing? The third member is what your drive shaft bolts up to and it has all the gears. The diff housing is what the axles are in. If it's the third member there are lots of places that sell them. If it's the diff housing I would say a junk yard is your best, maybe only, bet. You can try these guys.
http://www.jimsgotparts.com/
http://www.marlincrawler.com/differential/complete
Reply 4 : Rear Differential parts
Are you sure it's not leaking where the 3rd member bolts to the axle housing? That would be way more likely than the axle rusting thru, and way way way more likely than the 3rd member rusting thru.
Reply 5 : Rear Differential parts
its the diff housing. the cover where the fill plug is is completely rusting and a hole is actually beginning at the top, the 3rd member seems to be in excellent condition, I'll post some pics tomorrow and let ya take a look.
Reply 6 : Rear Differential parts
My friends have it. Give me your contact # bignloud9.
95' Camry Ignition cylinder stuck
So, I've got a 1995 Camry XLE (4cyl auto) with a problem. The key wouldn't go all the way in my ignition, had it towed home. Now it goes all the way in but you can't turn the ignition out of the 'LOCKED' position. In order to remove the lock cylinder, I need to have it turned to the 'ACC' position. What the hell can I do? I've actually pulled the ignition switch off the back of the lock cylinder, so now I can start the car, problem being, the steering wheel is still locked. I have no idea what to do. I could drive it if the wheel lock was off and I could change the ignition cylinder if I could turn the key. Any ideas?
Reply 1 : 95' Camry Ignition cylinder stuck
sounds like a problem with either the key interlock solenoid or the shift lock solenoid, or even the shift lock ECU. proper diagnostics can be found in the transmission section of the factory service manual if you have access.
Reply 2 : 95' Camry Ignition cylinder stuck
"drill retaining pin on the Ignition Cylinder". Had to find that out myself, thanks guys! lol
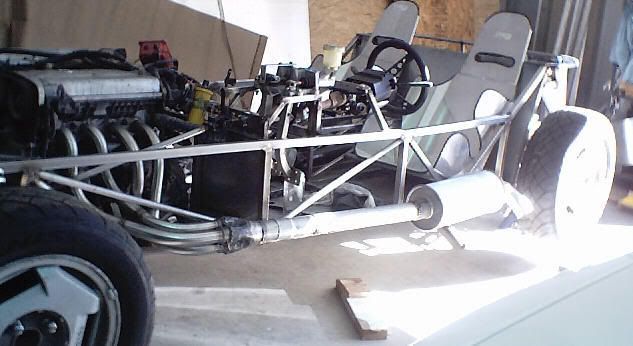
4a-fe dune buggy need opinions
I bought this buggy for $150 and I ordered an adapter plate from kennedy eng. for a 4a-fe. I have the donor car still so anything I need from it I have. I need some help with the wiring and fuel pressure issues. My big questions at this time are:
1) where is the circuit opening relay located on the car? (above fusebox inside car?)
2) Where can I find an inline fuel pump rated for the 4a-fe pressure? (30-33 psi was what I've found) (the cheaper the better)
3) Has anyone setup a 4a-fe with efi system on an off-road or standalone application? (I'm using as much of the car as I can. harness, ecu, intake, etc. )
Reply 1 : 4a-fe dune buggy need opinions
[IMG]
 [/IMG]
Reply 2 : 4a-fe dune buggy need opinions
[IMG]
 [/IMG]
Reply 3 : 4a-fe dune buggy need opinions
[IMG]
 [/IMG]
Reply 4 : 4a-fe dune buggy need opinions
That's pretty Fuckin BADASS!!! and i thought i was original :P
You can pretty much run the whole electronics in stock form just removing the body harness and your done!
well not really...
i use a walbro 255 fuel-pump at about 100psi and if anything it ran better in stock form! i would recommend it over most fuel-pumps oem or after-market.
as for the electronics i would just try to make it work in stock form so you don't have to remember how you ran a wire every time you have a prob.
Reply 5 : 4a-fe dune buggy need opinions
always wondered what people in OK did... lol
Reply 6 : 4a-fe dune buggy need opinions
If you use a Walbro (about $100), you could use a cheap fuel pressure regulator to turn the pressure down to whatever level you want. Those Walbros are very good pumps, if a bit noisy.
Nice project too. Keep us informed of how it works out.
Reply 7 : 4a-fe dune buggy need opinions
Nice! why a 4AFE though?
Reply 8 : 4a-fe dune buggy need opinions
Quote:
|
Originally Posted by REN69
Nice! why a 4AFE though?
|
Reply 9 : 4a-fe dune buggy need opinions
yeah in something like that... a 4afe is PLENTY... wont there be an issue with the engine sticking out the back way to much? Wouldn't think you would want so much weight over hanging the back like that
Reply 10 : 4a-fe dune buggy need opinions
if you look he's got a section missing from the rear and without completely changing drive-trains to something like an MR-2 he doesn't really have a choice... that's why he is a bit forward for a dune-buggy to counter-weight.
all in all this would be a ton of fun!! might even consider using a 4af with a nasty carb!!! say bye bye electronics...
Reply 11 : 4a-fe dune buggy need opinions
oh and here is a 250hp 9000rpm 4afe the way it should be...

and a 20v for shits
Reply 12 : 4a-fe dune buggy need opinions
Damn, now that's a 4afe! Where do you get racing parts for that engine? I've never seen racing stuff except pistons for the 4afe.
Okay, so I got my wiring down to just the engine after several hours. I have a single plug that I can jumper-wire and make electricity go to all sensors, fuel injectors, distributor, and I can kick the starter and cold-start injector by jumping another terminal. So as far as wiring, I'm doing good.
No word yet on the adapter plate. But should be soon, then the real fun begins.
And this is the only thing to do in oklahoma besides meth and fat girls. (not fond of meth, but fat girls aren't too bad)
Reply 13 : 4a-fe dune buggy need opinions
Oh, ghosty was right. I bought the donor for $100 and got it running in a few hours. I chose the 4afe because they are cheap, reliable, readily available, and did I mention cheap? Plus I have an extra engine to start building up if this project somehow needs more power.(not likely) I want efi because the stock carbs on those cars are crappy, I've had my share of aisin fits! And I don't want to spend the bucks on a weber or holley performance carb. The efi will be very reliable when I get it setup, hopefully. I'm worried about the oiling on this engine when I climb steep hills, cause it only hold 3 quarts. You guys think I may have an oiling issue on long hill climbs?
Reply 14 : 4a-fe dune buggy need opinions
Quote:
|
Originally Posted by okiejoe
Oh, ghosty was right. I bought the donor for $100 and got it running in a few hours. I chose the 4afe because they are cheap, reliable, readily available, and did I mention cheap? Plus I have an extra engine to start building up if this project somehow needs more power.(not likely) I want efi because the stock carbs on those cars are crappy, I've had my share of aisin fits! And I don't want to spend the bucks on a weber or holley performance carb. The efi will be very reliable when I get it setup, hopefully. I'm worried about the oiling on this engine when I climb steep hills, cause it only hold 3 quarts. You guys think I may have an oiling issue on long hill climbs?
|
or you could just go dry sump like the buggy above did
1992 front cartridge-style or sealed strut assembly?
Hi, folks.
I don't post here often, but it's finally time to re-do the struts on my 1992 DX sedan, and I need a little help. I have a brand-new pair of KYB strut cartridges sitting in the house that I picked up off Fleabay over a year ago. According to KYB's .pdf catalog, these front cartridges, SKU #363060, are for all 1988-92 FWD with serviceable strut (excluding GT-S). Yet I see also that there are also sealed struts for the exact same description of car. The catalog shows no differentiation between sedans, coupes, or wagons, just "All FWD" or "GT-S Model".
Does anyone here know offhand whether the 1992 DX sedan has sealed or serviceable front struts? Or is there an easy way to tell without removing the suspension? I just wanted to find out before I take the car to the mechanic for the job, only to find out I have the wrong damn struts.
Not that this has anythig to do with the price of coffee in Brazil, but I had a base 1987 AE82 sedan which had serviceable front struts with cartridges, which I guess is why I bought the cartridges for the 1992. Did some of the sedans come with serviceable struts, and others of the exact same type and model year come with sealed units? Is Toyota insane?
Sorry for the long post, and thanks in advance for your help, guys. I did do a search on "sealed strut cartidge" in the AE92 forum, but the results were inconclusive. Lots of info if I had a GT-S lol.
Reply 1 : 1992 front cartridge-style or sealed strut assembly?
my wagon has sealed struts. have to replace the whole thing.
Reply 2 : 1992 front cartridge-style or sealed strut assembly?
Yup, some came with sealed and some had cartridge type.
I have spare front sr-5 serviceable strut case (just the shell) if you want. lmk
Reply 3 : 1992 front cartridge-style or sealed strut assembly?
If it has a hexagonal nut on the top of the thick part of it it's servicable
It will look like this if it's servicable:

take off the wheel and look at it.
Reply 4 : 1992 front cartridge-style or sealed strut assembly?
Or if your car sits high enough, you can see it above the wheel without taking it off. You might have to reach in and move the bellows in the middle of the spring to see.
Reply 5 : 1992 front cartridge-style or sealed strut assembly?
sedans aren't serviceable..... I've only heard the GTS and the one pair in the SR5 being serviceable.
Reply 6 : 1992 front cartridge-style or sealed strut assembly?
Quote:
|
Originally Posted by toyotaspeed90
sedans aren't serviceable..... I've only heard the GTS and the one pair in the SR5 being serviceable.
|
Reply 7 : 1992 front cartridge-style or sealed strut assembly?
While on the topic, anyone had any luck gutting the rears and using choice of cartridge? Whats known to fit?
Reply 8 : 1992 front cartridge-style or sealed strut assembly?
If you gut the rears the only thing that'll fit easily is a koni yellow. It's designed to fit like that. You put a bolt through the bottom of the strut to hold it in place.
There is no top nut on the rears like there is on the front...
93-97 Corolla Short Shifter into AE92 GTS
There are very few options we AE92 owners have to choose from when searching for a short shifter. They are either really expensive (TRD/TWM) or can be difficult to source (AE101/CELICA Stock Shifter) and do not produce much result. There is, however, an alternative to the above mentioned. The part is very easy to source, it is very low priced, and the results are like day and night; it’s a 93 – 97 Corolla Short Shifter. It cost me about $17.15 after tax and free shipping. It came with the shifter itself (no bushings), spacers, and new bolts.

You’re going to need your basic set of metric sockets, a ratchet, phillips & flat head screw drivers, and a dremel w/HD cutting wheels. I went through 4 cutting wheels, they cost about $4.00 for 20 wheels.
1. Remove your shift knob, shift boot, center console and plastic trim from around the shifter. It is necessary to remove all of these because you will need the working space.
2. Remove the stock shifter and shifter cables. Remove the shifter plate from the chassis so it looks like the pictures in step 3. Here is an exploded view of the entire shifter assembly to aid you in this step.
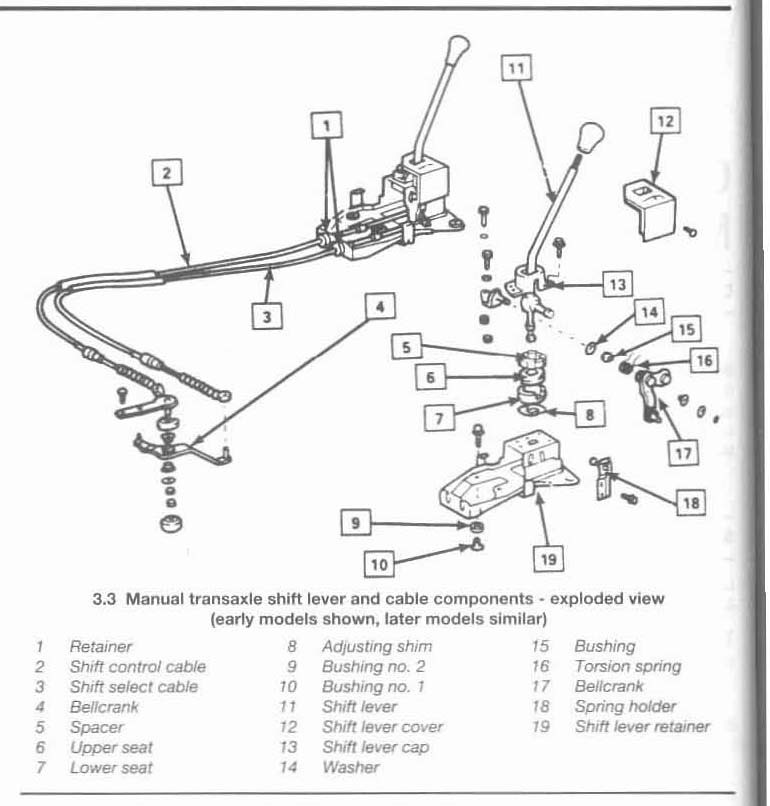
3. Cutting the shifter plate:
Make the cuts as shown in the picture below with the dremel. These cuts need to be made to allow full range of motion for the shifter and shifter cables. I made the cuts from both the top and bottom of the shifter plate. Reattach the shift cables to the modified shifter plate. Don't bolt the shifter plate back onto the chassis yet.


4. Spacers:
The spacers that came with the shifter have a lip that help guide the shifter plate for ease of installation. However, the lip is too high to use without the stock grommets or additional washers.

You have three options to choose from at this point:
i) Cut off the lip.
ii) Ditch the stock grommets and find some washers that will fit over the outside diameter of the spacer’s lip and match its thickness.
iii) Leave in the stock grommets and use the spacers.
I went with the third option as it was easiest and didn’t require another trip to the hardware store. Bolt the shifter plate back onto the your chassis.

There are 4 spacers total; one at each mounting point of the shifter plate. I only highlighted the two that were visible.
5. Shifter:
Grease up the balls of the new shifter and transfer all the stock bushings onto it. Before installing the new shifter it’d be a good idea to grease up the shifter sockets as well (to the left and below the shifter). Install the new shifter. Test out the new shifter in ALL GEARS before putting everything back together to make sure that the lower ball of the shifter and the cables have enough room to be operated. Make any additional trims to the shifter plate if necessary.

5. Plastic trims:
The center console and shifter trim will not over the raised shifter assembly. You need to stretch it out a bit. It is not noticeable once they're screwed in.

6. Shift Boot:
The shift boot will not fit over the shifter assembly because it has been raised. You will need to trim the plastic plate that is inserted into the shift boot to make it work. Make the cuts as shown below. And put your shift boot back on.


7. Put your shift knob on and take her out for a drive.
Comments:
I skipped the nitty-gritty details in hopes that most of you are mechanically inclined. The install should take about an hour to do. I hope the information in this write up is sufficient for your understanding. LMK if you have any questions.
Thanks to Pancho_Vanilla who drove 40 minutes to my house so I could take pictures while installing the short shifter into his car. My apologies for the lack of before and after pictures of the finished product, you'll have to live with out them or just install the short shifter to see it for yourself.
Here are some approximate measurements for the stock and aftermarket shifter:
Description: Measurement (Stock/Short Shifter)
From bottom of ball to bottom of shifter: 6.2cm/8.8cm
From top of ball to top of shifter: 22.3cm/16.6cm
Shifter position towards back: 6.1cm/2.7cm
Shifter position towards the left: 4.0cm/0.3cm
Lever arm sticking out of the side of the ball: 3.4cm/3.2cm
Spacer thickness: Not Applicable/0.8cm

Impression:
The new shifter is pretty awesome! It doesn’t feel like I’m driving a truck anymore. The throw is super short; it feels like at least a 60% reduction in throw distance (I didn't take actual throw measurements). The shifter sits lower and further from the driver but I’ve quickly gotten used to it. The shift knob sits right in the middle of all gears and not in the path of 1st to 2nd gear like other shifters.
Reply 1 : 93-97 Corolla Short Shifter into AE92 GTS
would love to know how to do it when you get the write up finished
Reply 2 : 93-97 Corolla Short Shifter into AE92 GTS
squeaks, someone already hit me up about this. we might be getting together this Thursday. So, expect the write up to be coming by the middle of next week.
Reply 3 : 93-97 Corolla Short Shifter into AE92 GTS
awesome looking forward to it
Reply 4 : 93-97 Corolla Short Shifter into AE92 GTS
good stuff because i bout a the 7th gen short shifter to mod it in but didnt have time but it did look like i need spacers and maybe cut the front of the shift bracket alil

Reply 5 : 93-97 Corolla Short Shifter into AE92 GTS
I believe the Celica (ST162?) short shifters fit as well... could be the same design for all of them.
Reply 6 : 93-97 Corolla Short Shifter into AE92 GTS
i doubt they're the same. when i was shopping for the shifter on ebay they were listed either as a corolla short shifter or a celica short shifter. If they were exactly the same i think they'd advertise them as being the same or compatible with both chassis. even TWM makes their shifters specific to either the celica or the corolla. too bad i dont have both a celica and corolla shot shifters in front of me to compare.
Reply 7 : 93-97 Corolla Short Shifter into AE92 GTS
Quote:
|
Originally Posted by 4dRcOrOlLA
good stuff because i bout a the 7th gen short shifter to mod it in but didnt have time but it did look like i need spacers and maybe cut the front of the shift bracket alil
|
Reply 8 : 93-97 Corolla Short Shifter into AE92 GTS
i've got a 5-6th gen celica gts short shifter in my 1990 corolla it fitted perfectly it could be a little shorter though. Im sure a shifter from the same model turbo version celica should be able to fit aswell it may even be shorter since it is the sportier model. I have been meaning to put up a thread with pictures on how i installed it.
Reply 9 : 93-97 Corolla Short Shifter into AE92 GTS
So is it a 7th gen corolla or a 6th-7th gen celica shifter?
Reply 10 : 93-97 Corolla Short Shifter into AE92 GTS
7th gen corolla aftermarket short shifter
Reply 11 : 93-97 Corolla Short Shifter into AE92 GTS
Sorry about getting there late, I had to pump gas.
Anyway I just got home and shifter is working great. I got stuck in traffic on the way home so it's thoroughly tested. Thanks again, I'll be looking forward for the write-up.
EDIT: Here are the pictures of it installed before and after
This is when it was cut (I'm never doing that again)

And here it is after,


The throws are about 3 1/2 inches from 1st to second and so on


Reply 12 : 93-97 Corolla Short Shifter into AE92 GTS
Write up, write up, going to start a riot soon
Reply 13 : 93-97 Corolla Short Shifter into AE92 GTS
lolz
Reply 14 : 93-97 Corolla Short Shifter into AE92 GTS
write up is up. Mods, can you please add "How-To:" to the title that shows up in the list of threads?thx
header worth it? 4afe
so my 92 5 speed wagon has a bad exhaust leak near the manifold which I assume to be the infamous manifold crack. I'm going to replace the manifold very soon and was wondering if a header is worth the money.
I found a manifold on eBay for 60 bucks and pacesetter longtube header for 120. would I see a noticeable gain in performance or gas mileage? I'm going to delete the catalytic converter and I have a short ram intake on it already. I just don't know if a header is worth the extra money.
has anyone used the pacesetter header on a 4afe? if so what did you think?
Reply 1 : header worth it? 4afe
bump. Trying to find out how much there is to gain with a header. I've searched on here and found nothing but people talking about fitment or quality of different headers but nobody said if there was a decent gain.
Reply 2 : header worth it? 4afe
Eh, you'll probably feel something but measurably it may be very small. Go with the ebay, iirc the pace setter is the same thing.
Reply 3 : header worth it? 4afe
No power gain with either a header or deleting the cat (unless cat is clogged due to years of driving with the engine poorly tuned). Gains come from tuning the car the way it was when it left the factory. Using factory spark plugs purchased from a Toyota dealer, for example, will give you plugs set to a tight .029 or .030" in gap which is great for power. Cleaning up your gooey throttle plate will give you power gains too as will a new oxygen sensor, new Toyota air filter and setting the ignition timing to factory spec. Cracked manifolds don't happen if the 4afe owner is willing to drive the car gently for the first 3 miles in the morning.
Reply 4 : header worth it? 4afe
Quote:
|
Originally Posted by verlaryder
No power gain with either a header or deleting the cat (unless cat is clogged due to years of driving with the engine poorly tuned). Gains come from tuning the car the way it was when it left the factory. Using factory spark plugs purchased from a Toyota dealer, for example, will give you plugs set to a tight .029 or .030" in gap which is great for power. Cleaning up your gooey throttle plate will give you power gains too as will a new oxygen sensor, new Toyota air filter and setting the ignition timing to factory spec. Cracked manifolds don't happen if the 4afe owner is willing to drive the car gently for the first 3 miles in the morning.
|
I know for a fact my intake flows better than factory. that's a MPG gain and throttle response gain over a factory Toyota filter. I know a header will flow better and I will see a gain but I'm trying to see what other people have seen as to it being worth the extra money.
I know how cars work and how to gain power. I also know how to maintain my car. I'm ASE certified. just trying to feed off of other people's experience before I spend money.
Reply 5 : header worth it? 4afe
you know, i had some pacesetter headers on my old ae92 sedan, and the sound it made was awesome, it was the closes thing i had to a impreza it had a awesome rumble and when i put the exhaust 2.25 straight back it was even meaner rumble(i had a flex pipe put in too) with the apex N1 style ebay muffler. i loved it soo much, the little bit more kick to having a CAI, headers, exhaust and adj fuel reg. i drove the car like litterally 200 miles and the headers cracked and broke off the flanges on the head... thats my experience with pacesetter headers for my ae92 sedan... =(
Reply 6 : header worth it? 4afe
Quote:
|
Originally Posted by mapolley07
no offense but you sound like you're just trying to sell me Toyota parts. factory settings are almost always not set ideal for MPG or power but set to run rich and retarded timing for reliability. I'm ASE certified.
|
When they were new and equipped with Toyota parts, 4AF and 4AFE Corollas with 5-speed manual trannys delivered 35-37 MPG at highway speeds of 60-70 MPH. But the owners on this forum who are contemplating installing headers and/or disconnecting their catalytic converters are only getting around 28-32 MPG because they use aftermarket spark plugs that come with wide spark plug gaps, their throttle plates have gooey deposits, their oxygen sensors are moderately to heavily worn, their ignition timing is not set to factory specs, some of the valve clearances may be looser than factory specs, etc.
Reply 7 : header worth it? 4afe
I read somewhere that the headers off of a newer model corolla (98+ i think?) with the 7/4afe has a better header design as it is a 4-2-1 header.
Reply 8 : header worth it? 4afe
Quote:
|
Originally Posted by verlaryder
The Toyota engineers would tell you the factory fuel mixture is set for the lean for top fuel economy and emission control. Here's a quote out of the 1976 Toyota Corona owners manual: "Your new engine is tight and runs on a very lean fuel mixture for emission control."
When they were new and equipped with Toyota parts, 4AF and 4AFE Corollas with 5-speed manual trannys delivered 35-37 MPG at highway speeds of 60-70 MPH. But the owners on this forum who are contemplating installing headers and/or disconnecting their catalytic converters are only getting around 28-32 MPG because they use aftermarket spark plugs that come with wide spark plug gaps, their throttle plates have gooey deposits, their oxygen sensors are moderately to heavily worn, their ignition timing is not set to factory specs, some of the valve clearances may be looser than factory specs, etc. |
#1.... lean actually makes more power. cars (especially boosted ones) are run rich because lean is hotter and increases the possibility of knock.... which can ultimately destroy a motor.
#2... "Toyota" parts are not special. They just aren't. This has been gone over and over... yet those who are gung-ho on "original Toyota" parts aren't ever willing to listen. Toyota doesn't make most of their parts. They assemble. It would cost them way too much to have a plant that makes spark plugs, wires, o2 sensors, etc.
Factory spark plugs are Nippon Denso. NGK's are just as good for imports. Spark plug gaps can always be attained from any parts worker and it's up to you to check the gap.
Factory o2 sensors are made by NTK (which is the same company as NGK). Bosch are widely available and what come factory in many german cars -- either way, NTK or Bosch are available easily.
as for other comments.... in NA there was no 4/7afe after 1997. The heads are designed differently, I would guess that the exhaust ports aren't the same (could be wrong, though). intake ports ARE different and there are other, subtle, changes. Around 1991/1992/1993 is also when Toyota went from a 16v 4age to a 20v 4age... and many more changes were made... it was a generation change for the corolla and I would guess the exhaust ports are different on a 4/7afe head.
Reply 9 : header worth it? 4afe
I had a Pacesetter (black) header on a Tercel, and was quite dissappointed at how quickly it rusted. within about 2 months the whole thing was covered with a coat of rust.
It never cracked or leaked for the 3 years that I had it on the car, but it made me ashamed to open my hood. I won't buy a Pacesetter again.
I had a chrome OBX header on a 92 Corolla (4A-FE), but I never drove that car with the stock manifold installed, so I couldn't compare the performance. I had bought it with a blown head gasket, and the manifold was cracked.
I don't think you should expect a sizeable performance gain with just a header, but it will save weight, and look cool.
Subscribe to:
Comments (Atom)